


This article highlights the advantages of using GitHub Actions for CI/CD. It's easy to set up, integrates with your code on GitHub, and encourages developers to add CI/CD to their workflow.
As projects grow, GitHub's native hosting can become costly and less scalable. Self-hosted runners can help solve this. They use the same workflows but with your configuration, leveraging your infrastructure.
At Trunk, we’ve adopted self-hosted runners for scalable pipelines, ensuring efficient resource use. Here were our top three reasons to switch to self-hosted runners:
1. Cost Efficiency:
GitHub’s hosted runners may appear cheap for small-scale projects. However, as your demand scales and you start to parallelize your runs, your costs rise, hitting thousands of minutes per month.
For instance, GitHub's pricing for an 8-core, 32 GB machine is $1.92/hr. If you were to provision the same machine on AWS, it would cost merely $0.1468/hr. That is a 13X markup you will pay for every minute by hosting on GitHub. If we just look at the Linux box costs, here's how they stack up against AWS:
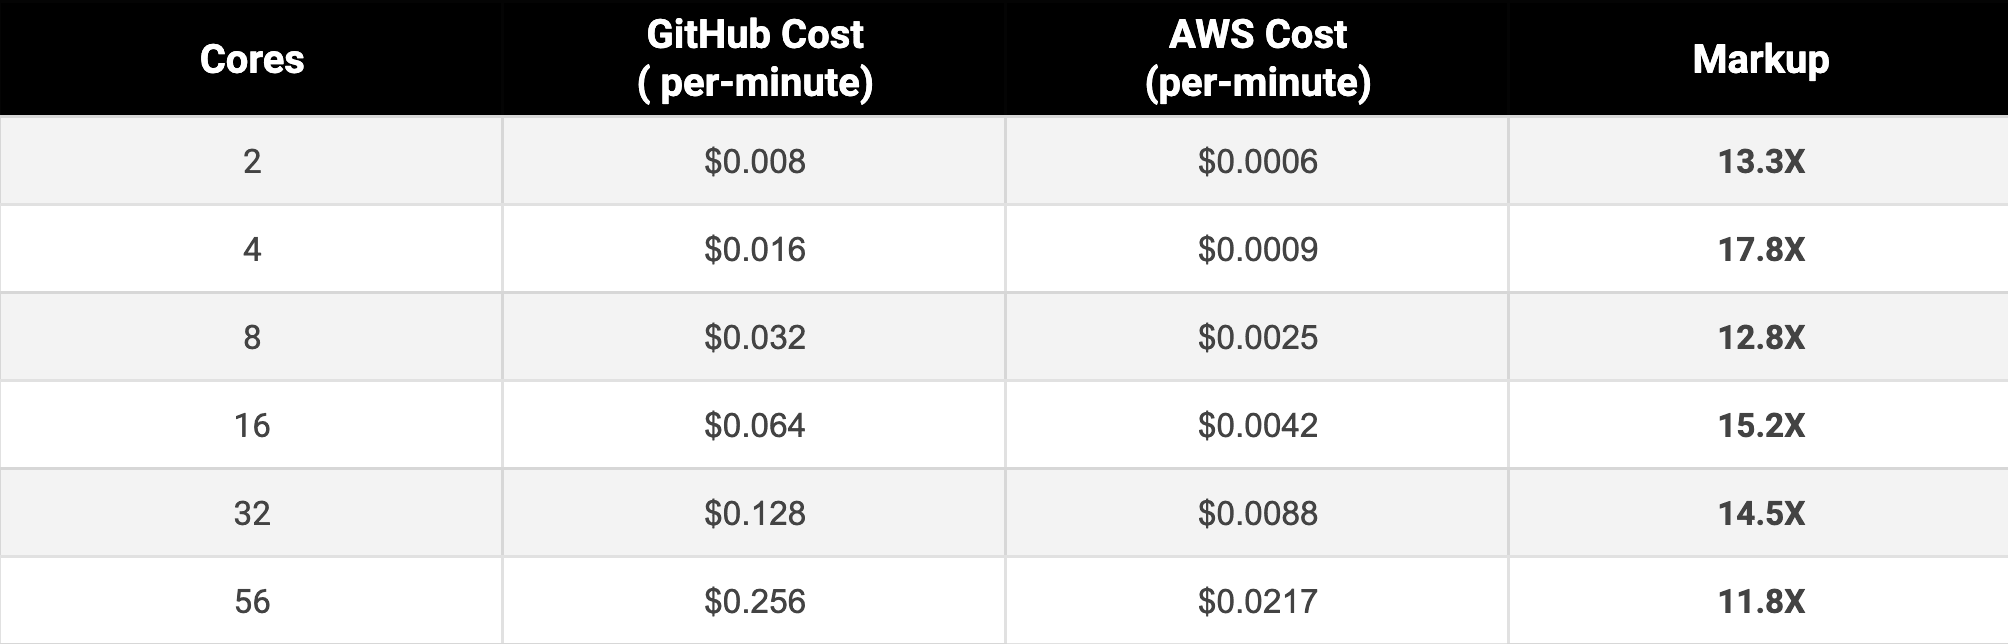
Because you can bring your own machine (whether on-prem, a VM, a container (as we use), or even your local machine), you can choose more powerful hardware or optimize resource allocation based on your project's needs. This can lead to faster build and test times, especially for resource-intensive tasks.
Self-hosted runners also allow you to fully customize the environment, including the underlying hardware, software, and network configurations. This can be particularly useful if you have specific dependencies or configurations that are unavailable or unsupported in the default GitHub-hosted runners.
This includes:
GPUs: GitHub's default infrastructure is CPU-only. Self-hosted runners allow for GPU-intensive jobs, like machine learning pipelines.
CPU-to-memory ratios: GitHub's larger runners use a N-cores, 4xN GB model. Self-hosting lets you customize, like having 8 cores with 128 GB memory.
Disk usage: GitHub's offerings can be expensive for jobs needing significant storage but minimal memory. Self-hosted runners allow tailored disk-to-compute ratios.
3. Better Caching:
Caching environments and dependencies can speed up builds and tests. GitHub-hosted runners have slow cache response times. With self-hosted runners, you can use a local hardware cache, which is much faster. A warm cache means assets are ready in milliseconds without repeated downloads.
At Trunk, self-hosted runners allow us to better customize our CI infrastructure, making tests and builds faster and cheaper. The key is using the right infrastructure at the right time. We’ll cover hosting GitHub Runners on Kubernetes in our next article. For now, check out CI Analytics to see your CI workflow time.
In this guide, I’ll describe the infrastructure we use to host the GitHub Actions Runners that power all of our CI and provide the code and commands necessary to do it yourself.
Actions Runner Controller
The Actions Runner Controller (ARC) is an open-source project for self-hosting GitHub Actions Runners on Kubernetes. It functions as a Kubernetes operator, automating the management of self-hosted runners within a cluster. The operator pattern in Kubernetes is designed to emulate the tasks performed by a human managing a service. Simply put, ARC takes over the tasks that would otherwise require manual intervention for managing a cluster of self-hosted runners.
When we started writing code at Trunk.io, we used GitHub-hosted runners for all our CI jobs. At the time, GitHub runners only had 2 CPU cores and 7GB RAM Linux machines. Building and testing our C++ CLI quickly got slow on these small machines, so we began to self-host machines with beefier specs. Build times dropped precipitously, and everyone at Trunk.io rejoiced. We started with five dedicated VMs, but we needed to add more as the team grew.
This typically happened when someone posted in our #engineering slack channel about their pull requests waiting for available runners, after which I would dust off my “add a new runner” runbook, manually provision another VM, and register the runner with GitHub so it could start taking new jobs. The process would usually take about 30 minutes, not counting the cost of context switching from writing code to operating the runners. This ”operator” role also involved investigating why a runner might happen to be offline. While a simple restart fix was usually sufficient, that would also require another 30 minutes.
ARC aims to automate all of that work. Instead of needing a human to allocate a new VM, wait for it to boot, install the runner software, and register the runner, that happens automatically. The controller can also replace runners that have crashed or had other failures by automatically spinning up a new one.
Prerequisites
In order to use ARC, ensure you have the following:
A Kubernetes cluster
For a managed cloud environment, you can use AKS. For more information, see Azure Kubernetes Service.
For a local setup, you can use minikube or kind. For more information, see minikube start and kind.
Note: OpenShift clusters are currently unsupported.
Helm 3
For more information, see Installing Helm.
While it is not required for ARC to be deployed, we recommend ensuring you have implemented a way to collect and retain logs from the controller, listeners, and ephemeral runners before deploying ARC in production workflows.
Installing Actions Runner Controller
To install the operator and the custom resource definitions (CRDs) in your cluster, do the following:
In your Helm chart, update the
NAMESPACEvalue to the location you want your operator pods to be created. This namespace must allow access to the Kubernetes API server.Install the Helm chart. The following example installs the latest version of the chart. To install a specific version, you can pass the
--versionargument along with the version of the chart you wish to install. You can find the list of releases in the GitHub Container Registry.
1NAMESPACE="arc-systems"2helm install arc \3 --namespace "${NAMESPACE}" \4 --create-namespace \5 oci://ghcr.io/actions/actions-runner-controller-charts/gha-runner-scale-set-controller
For additional Helm configuration options, see values.yaml in the ARC documentation.
To enable ARC to authenticate to GitHub, generate a personal access token (classic). For more information, see Authenticating to the GitHub API.
Configuring a runner scale set
To configure your runner scale set, run the following command in your terminal, using values from your ARC configuration.
When you run the command, keep the following in mind:
Update the
INSTALLATION_NAMEvalue carefully. You will use the installation name as the value ofruns-onin your workflows.Update the
NAMESPACEvalue to the location you want the runner pods to be created.Set
GITHUB_CONFIG_URLto the URL of your repository, organization, or enterprise. This is the entity that the runners will belong to.
This example command installs the latest version of the Helm chart. To install a specific version, you can pass the --version argument with the version of the chart you wish to install. You can find the list of releases in the GitHub Container Registry.
Note:
As a security best practice, create your runner pods in a different namespace than the namespace containing your operator pods.
As a security best practice, create Kubernetes secrets and pass the secret references. Passing your secrets in plain text via the CLI can pose a security risk. For more information, see Deploying runner scale sets with Actions Runner Controller.
1INSTALLATION_NAME="arc-runner-set"2NAMESPACE="arc-runners"3GITHUB_CONFIG_URL="https://github.com/<your_enterprise/org/repo>"4GITHUB_PAT="<PAT>"5helm install "${INSTALLATION_NAME}" \6 --namespace "${NAMESPACE}" \7 --create-namespace \8 --set githubConfigUrl="${GITHUB_CONFIG_URL}" \9 --set githubConfigSecret.github_token="${GITHUB_PAT}" \10 oci://ghcr.io/actions/actions-runner-controller-charts/gha-runner-scale-set
For additional Helm configuration options, see values.yaml in the ARC documentation.
From your terminal, run the following command to check your installation.
1helm list -A
You should see an output similar to the following:
1NAME NAMESPACE REVISION UPDATED STATUS CHART APP VERSION2arc arc-systems 1 2023-04-12 11:45:59.152090536 +0000 UTC deployed gha-runner-scale-set-controller-0.4.0 0.4.03arc-runner-set arc-runners 1 2023-04-12 11:46:13.451041354 +0000 UTC deployed gha-runner-scale-set-0.4.0 0.4.04
To check the manager pod, run the following command in your terminal:
1kubectl get pods -n arc-systems
If everything was installed successfully, the status of the pods shows as Running.
1NAME READY STATUS RESTARTS AGE2arc-gha-runner-scale-set-controller-594cdc976f-m7cjs 1/1 Running 0 64s3arc-runner-set-754b578d-listener 1/1 Running 0 12s
If your installation was not successful, see Troubleshooting Actions Runner Controller errors for troubleshooting information.
Using runner scale sets
Now you will create and run a simple test workflow that uses the runner scale set runners.
In a repository, create a workflow similar to the following example. The runs-on value should match the Helm installation name you used when you installed the autoscaling runner set.
1name: Actions Runner Controller Demo2on:3 workflow_dispatch:45jobs:6 Explore-GitHub-Actions:7 # You need to use the INSTALLATION_NAME from the previous step8 runs-on: arc-runner-set9 steps:10 - run: echo "🎉 This job uses runner scale set runners!"
Once you've added the workflow to your repository, manually trigger the workflow. For more information, see Manually running a workflow.
To view the runner pods being created while the workflow is running, run the following command from your terminal:
1kubectl get pods -n arc-runners
A successful output will look similar to the following:
1NAMESPACE NAME READY STATUS RESTARTS AGE2arc-runners arc-runner-set-rmrgw-runner-p9p5n 1/1 Running 0 21s
Maintenance and Monitoring
Getting an autoscaling cluster of self-hosted runners is a big achievement - congratulations! But getting the compute in place is just one part of administering a good CI system. Speed, reliability, and CI cost are constant concerns at engineering organizations, regardless of size. CI is a crucial part of an engineering team - when CI gets slow or unreliable, the engineering team grinds to a halt. To keep your team's velocity high, keep your CI healthy so it doesn't become a productivity bottleneck. To do this, you'll need a way to track metrics about job wait time - the amount of time a job waits to be scheduled to a runner. This will help you tune your autoscaling cluster to ensure it can handle the load you need.
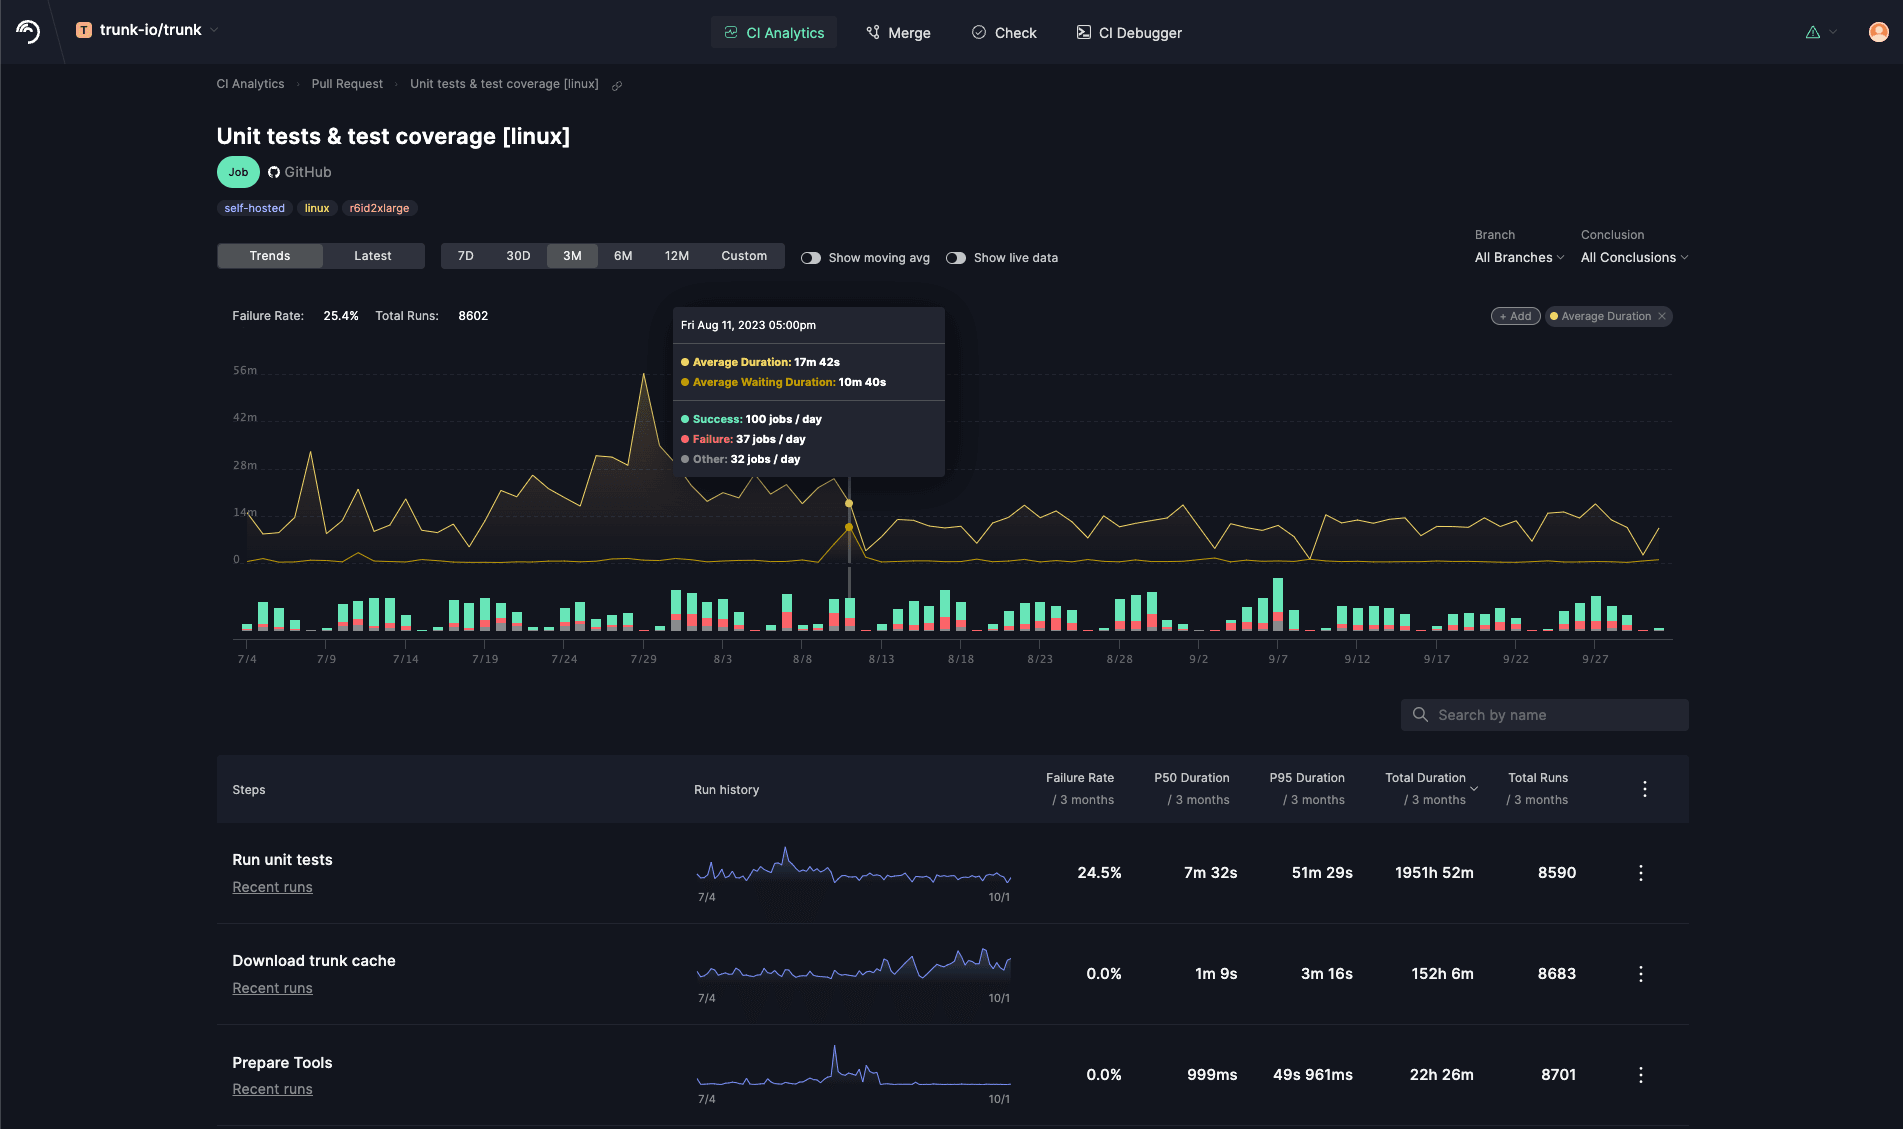
We built Trunk.io CI Analytics to help you monitor and optimize your CI workflows. Receive real-time alerts when a pull request introduces changes that slow down your test workflows. Easily investigate and resolve flakiness by accessing before-and-after metrics that validate your fixes. Gain valuable insights into resource usage, that can help you cut costs without compromising test throughput. Best of all, enabling CI Analytics takes only a single click.